Anaglyph Compositing in Photoshop
iaian7 » tutorials » photoshop John Einselen, 9.08.12 (updated 9.08.12)When working in Adobe Photoshop with stereo imagery, you’ll note that it’s impossible to layer elements with precomputed anaglyph compositing, even if they include a good alpha channel (unless you’re dealing with clever screen-level edge depth, which I’ve gotten to work before). Anaglyphic comping has to be the last step or it’s just not going to work; the downside of having only one alpha channel for three different colour channels.
But fear not! Based on the [admittedly more advanced] image manipulations in Quartz Composer developed at Vectorform, we can set up decent anaglyphic composites in Photoshop using just the Channel Mixer and Level adjustment layers (you can also get this same tutorial for Adobe After Effects). Not only does the Photoshop setup let us skip having to run designs through a visual effects workflow, we can see immediate feedback. Just pop on your glasses, and start editing with realtime results.
We’ll go through Anachrome compositing in detail, then give an overview of the differences for Trioscopic and ColorCode compositing. You’ll find a download link for the Photoshop template at the end of each section. Requires a minimum of CS1, using folders with transparency overlays to composite.
The example imagery used throughout the tutorial is created in Lightwave using another of my tutorials, Stereoscopic Cameras. You can just as easily drop in any photoshop comp, shifting layers to the left and right to control depth. Assuming viewers are predominantly right eye dominant, you may be able to get away with a flattened right eye image, and only shift layers for the left eye to create the impression of depth. Ideally, you’ll shift each layer the same distance (albeit in the opposite direction) for each eye to keep the elements centred on their original location in the design, but at different apparent depths. Subtlety is the best approach; shifting a layer just 5 pixels left for one eye and 5 pixels right for the other is enough to create quite a bit of apparent depth.
More advanced techniques for creating or simulating stereo imagery in Photoshop is out of scope for this tutorial though, so on to the compositing setup…
Anachrome
This is the slightly newer red/cyan version of the classic red/blue anaglyphic technique, which has enjoyed widespread use for quite a few years. It’s possible to obtain partial colour reproduction of blues, greens, and yellows, but mixing in larger amounts of red is a dangerous balance between tricking the brain into assuming color reproduction, and headache inducing retinal rivalry (where the brain is unable to make sense of conflicting colours from each eye, and essentially starts a heck of a storm). The following compositing setup uses a 10% red channel boost, helping avoid eye strain while still imbuing a hint of colour.
 Create a document the final size of your stereographic output, drop both the left and right eye layers into the image, and group the two layers into a
 Left Eye and Right Eye folder. While using clipping masks also works (option-clicking between layers to stack them), this is a more robust setup for quickly dropping in new artwork without having to rework the adjustment layers. Change the transparency mode of the left eye group to Screen.
 In the right eye group, create a
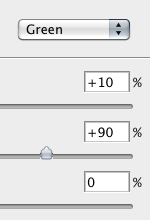
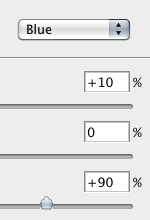
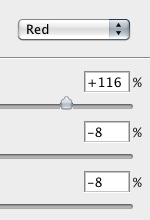
 Channel Mixer adjustment layer and enter the following settings for red, green, and blue channels:

 To counteract the overly bright green+blue channels, we need to add a
 Levels adjustment layer and set the gamma to 0.85.
 In the left eye group, create a
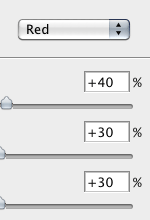
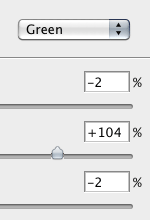
 Channel Mixer adjustment layer, using the following settings for red, green, and blue channels:

 Create a
 Levels adjustment layer and set the gamma to 0.85, helping brighten the otherwise dark red channel.
 Lastly, we want to counteract fringing by adding and subtracting channels. Create another
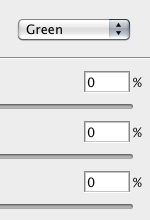
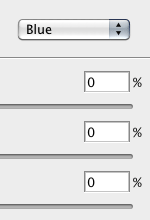
 Channel Mixer adjustment layer above both eye groups, with the following settings:
Download
TrioScopic
Green/Magenta glasses have become more popular in recent years, as many stereoscopic films like Coraline and Monsters vs. Aliens have begun releasing Trioscopic versions. While still not reaching the ubiquity of Anachrome, it’s more common than it used to be. Same as any anaglyph technique, color reproduction is limited. Because the magenta lens is designed to pass both red and blue wavelengths, colours in that range are easiest to perceive, while yellows, greens, and teals are least visible.
TrioScopic has a brightness advantage, as combining red and blue channels (which tend to be darker) for one eye, and using the single green channel (which tends to be brighter) for the other eye, produces more balanced luminance values and reduced retinal rivalry.
We can use all the same Channel Mixer settings, but the role the red channel plays is replaced by the green channel, and instead of combining green and blue, we combine red and blue.
Download
ColorCode
Though used during the US 2009 Super Bowl and an episode of Chuck, ColorCode has yet to catch on to widespread use, despite being marketed as producing better perceived colour reproduction.
In the case of ColorCode, it pairs the red and green channels together for one eye, using blue for the other. This creates an obvious mismatch in luminance (blue being the darkest phosphor or dye used in display technology), and the glasses attempt to compensate by using a dark amber lens instead of yellow. While it’s largely successful, you may still need to use Levels adjustment layers to tune the gamma for left and right eye groups.
Ghosting seems especially apparent with many ColorCode glasses. Because of this, the third channel mixer (adding and subtracting the left and right eye results) uses much stronger values, and even duplicating the layer may help. Increasing the contrast of the right image (blue channel) can also decrease ghosting and improve the perceived depth effect, depending on the imagery being displayed.
Download
Newtek and Lightwave 3D are either registered trademarks or trademarks of Newtek Incorporated in the United States and/or other countries.
Adobe, Photoshop, and After Effects are either registered trademarks or trademarks of Adobe Systems Incorporated in the United States and/or other countries.


