Dynamic Paper Cutouts
iaian7 » tutorials » aftereffects John Einselen, 25.09.09 (updated 13.01.10)While stop motion can be a fantastic medium, the process is too slow for many productions. Even for simple elements, like wrinkled paper, the time it takes to do things physically is often untenable; for the Microsoft PowerPivot online advertising campaign, Vectorform required lightening quick turnaround on visual elements and animation revisions, often on an hour by hour basis.
This is how the paper cutout effects were designed and generated dynamically using Adobe After Effects.
Animation with alpha
For our example video, character animation was handled in After Effects. Having broken down the script and subsequent voice acting into paragraphs, the lipsync was animated in Papagayo (see Lipsyncing with Papagayo for more on this important aspect of the high-speed workflow) and the elements were animated in individual compositions for each clip.
In other cases, the animation may be a 3D rendering, from another application, or hand drawn. The biggest concern here is that the elements must have full alpha, with no backgrounds or half-transparent portions (antialiasing is good, but there may be issues with large patches of partial transparency once we start playing with alpha boundaries).
Paper textures
Depending on the desired effect, this can take all sorts of forms. For the Microsoft PowerPivot video, a sequence of crumpled paper photos were used along with frame blending in After Effects. This was slowed down (again, using frame blending) till the desired look was found. The final paper texture animation should be the same size and length as the other comps.
Using directional R/G/B lighting when photographing the crumpled paper could make it possible to develop false geometric distortions in After Effects, gaining a little more realism in how the imagery follows the shape of the paper. This tutorial, however, only covers the use of plain-lit paper textures.
Effects
 The animation and paper compositions should be added to a new comp of the same size, and an adjustment layer and plain white solid should be created.
Adjustment Layer
 Two expression slider controls allow us to globally control the strength of the displacement effects (to be applied to the animation and white solid layers), while the drop shadow performs a very basic role; add a little bit of lighting to an otherwise flat paper effect.
Animation
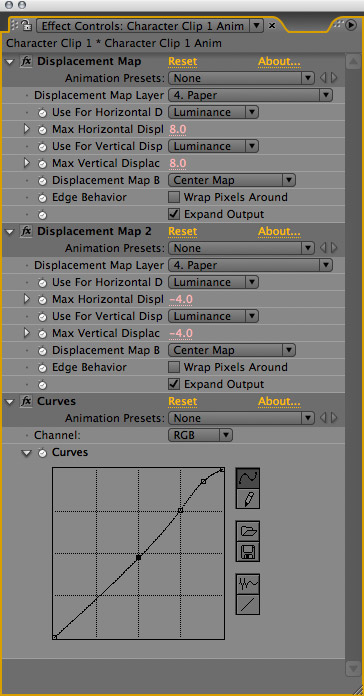 Because After Effects’ Displacement Map effect is unidirectional, two are applied to help give a little more depth and variation. The displacement source for each effect should be set to the paper texture layer. Option-clicking on the animation badge (the stopwatch icon) lets us add expressions to the Max Horizontal and Max Vertical displacement values.
For the first Displacement Map effect, apply this expression to both Max Horizontal and Max Vertical:
thisComp.layer("Adjustment Layer 1").effect("Displacement Slider")("Slider")
The second Displacement Map effect needs this expression applied to both Max Horizontal and Max Vertical:
thisComp.layer("Adjustment Layer 1").effect("Displacement Slider 2")("Slider")
Lastly, a Curves adjustment is added to help the colours and values pop. Adding all the shading, textures, and distortions can start to muddy and dull the animation, so curves are used throughout to brighten and enhance the imagery.
Set the layer Transparency Mode to Multiply to apply it to the underlying layers.
White Solid
This is the most complicated of the layers, with two main purposes; to expand and create the torn paper edges, and add depth to the underlying paper textures.
 The Set Channels effect is important, as we use this to grab the alpha channel from the animation layer. Select layer 2 in the source layer 4 input, all the other settings can be left at their defaults.
Use Simple Choker to expand the alpha, creating the extra white space needed for the torn paper edge.
 Just like the animation layer, add two Displacement Map layers with inputs set to the paper texture, and the following expressions applied to Max Horizontal and Max Vertical displacement values.
thisComp.layer("Adjustment Layer 1").effect("Displacement Slider")("Slider")
thisComp.layer("Adjustment Layer 1").effect("Displacement Slider 2")("Slider")
To finish the tearing of the paper edge, apply a Turbulent Displace effect and tune to taste. The amount, size, and complexity will all depend on the scale of the compositions and the desired style. Because the previous displacements are based on the animated paper, and the turbulence is based off of the new alpha shape, the effect will change automatically based on the strength and speed of the paper animation. Animating the evolution is possible, but typically adds far too much action and confusion.
 After Effects’ Emboss is rudimentary at best, but once applied, we can add Channel Blur to soften the results into a usable effect (taking care not to blur the alpha). Matching the emboss relief value with the R/G/B channel blurs tends to work best. The direction is left at 0 degrees, giving a slightly concave appearance. This helps create the appearance of a slight page curl along the edges.
Lastly, a Curves adjustment is added to brighten up the output and improve the final composited tonality. Setting the layer transparency mode to Soft Light allows the emboss effect to adjust the underlying paper texture.
Paper texture
 Set the Track Matte to use the above layer’s Alpha, and the look is almost complete. In the example project, Levels were used to brighten the paper texture. This depends, of course, on the paper textures used and how dark the resulting paper crumple needs to be.
Final Compositing
Once completed, the composition is ready to be used in the final edit. For graphics that border the edge of the composition, there may be some artifacts left over from the multiple displacements. To fix this, either increase the size of the pre-comps to slightly larger than your output, or scale up the comp in the final video to cut off edges.
Watch the final PowerPivot video on YouTube or Vimeo to rate it or leave a comment!
Downloads
Get the exclusive project downloads from the Vectorform blog post.
Adobe and After Effects are either registered trademarks or trademarks of Adobe Systems Incorporated in the United States and/or other countries.
 mediaboxAdvanced